Yes, we’re terrible about updating this blog.
No, we don’t want to waste your time.
Until the return, may we recommend some good old paper books: http://cabinporn.com/tagged/book

Yes, we’re terrible about updating this blog.
No, we don’t want to waste your time.
Until the return, may we recommend some good old paper books: http://cabinporn.com/tagged/book

A few months ago, I bought a Martha Stewart magazine at the Orlando airport to read on the way home form a business trip. Now many of us feel bewildered by Martha’s projects — make a tiki torch out of clothespins! Bake a 27-layer cake in just two hours! — but as I was thumbing through the pages I found something I was interested in trying for the cabin: curtains made out of drop cloth. Martha convinced me that canvas dropcloth is cheaper than craft store fabric, heavy weight, and built to stand up to anything. Perfect for the cabin!
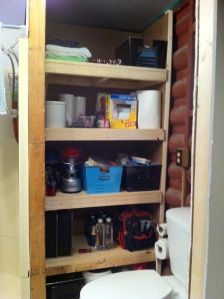
As part of the bathroom renovation, we added a closet next to the shower stall. It’s pretty much our only storage area, so in addition to the usual bathroom stuff (towels and cleaning products) the closet also houses a ginormous toolbox, painting supplies, lanterns, cans of propane, and … well, you get the picture. We’ve been thrilled to have the storage but not thrilled about the constant mess in the bathroom, which is finally completed!
Here are a few pics of the transformation.

This is really just a photo post showing you the before and after of our outdoor lighting. We bought a Portfolio brand lighting kit from Lowe’s about six months ago and have been dragging our feet to put it in because we thought it was going to be a lot of work. We couldn’t have been more wrong!
The kit came with a 200 watt transformer (not pictured in the link because I can’t find it) and four spotlights. We added about ten pathway lights and are thrilled with the results! The wiring is very easy – just press the wire into the light base and two copper pins make the connections for you. Since Janeé is an electrical whiz, she was also able to splice some additional wire in to give us more coverage. The transformer box has a light-sensing eye so it turns on automatically at dusk. Easy!
The cabin was built in the 1960’s with undersized beams and joists. Overtime, this of course causes problems. If I was more diligent with my blog I would have provided a much better story – we’ll just sum it at this: The cabin was sagging and one of the piers had sunk several inches. T.L. Davenport Builders (my heroes) lifted the cabin and reinforced structure. The result is an unleveled sliding door inside and much more sturdy cabin!
Sorry for all the yelling but we’re pretty darn excited. With the help of T.L. Davenport Builders, the cabin is sporting a brand spanking I can’t believe how pretty, safe, and sturdy deck!
Those who were willing to brave the cabin the past 12 months knew the deck rules – no more than three people at one time and don’t stand on the bright orange x’s.
A few things we learned during the process:
Still to come:
 The cabin water makes its way to a 55 gallon blue storage tank via gravity from a spring-fed cistern at an average rate of 100 gallons/hour. The lopsided tank was insulated with a large piece of carpeting and covered by some fancy blue styrofoam.
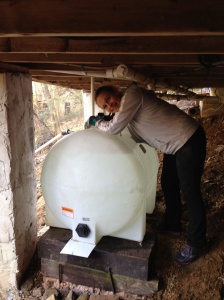
With easier access under the structure during deck demolition, we took the opportunity to get tanked.
A quick trip to Tractor Supply for a 135 gallon leg tank I’d had my eye on for the past six months and I was ready to roll.
After some excavation, I set up a sturdy foundation for the tank to rest on. There is nearly one foot of gravel under each of the timber steps.
Everyone got dirty, even Toby then yellow lab!
The new tank has a rather ugly overflow pipe that will thankfully be hidden by the new deck. We are looking forward to building a water feature for the overflow to play on.
We’ve done a ton to the cabin this spring, and we owe you a few back posts to tell you about the new deck and the foundation repair project. This morning, we had four tons of gravel delivered to make our parking space easier to navigate. (The muddy hill arrangement was getting just a bit tiresome.)
After a phone consultation with Leroy, we got A2 stones from The Mill in Whiteford, MD for just under $20/ton plus a small delivery fee. I wasn’t sure how much volume four tons of rock would be, and it firms out it wasn’t quite as much as I thought. The delivery filled our 20 x 8′ parking space pretty nicely with a few bucketfuls left for muddy ruts in the road. Definitely not enough for the fire pit that we thought we might also get out of this delivery.
Here’s the stone selection at The Mill:
After all the work of raking and shoveling was done, Stanley celebrated with an iced Irish coffee.
Spring is here, and we are thrilled to have the water back on at the cabin. To unwinterize, we had to flush the antifreeze out of all the lines, flip on the pump, and watch on amazement as the cabin sprung back to life. Water in the shower? Check! Bathroom sink and toilet? Check! Kitchen sink? ….. Kitchen sink? …. Well, shoot.
So the next two hours went something like this: jiggle the pipes, bang with wrench, turn the faucet on and off, unhook the pump, more banging, more jiggling, and the eventual realization that we should disassemble the faucet. And when we did, we found this: a sneaky plastic aerator with the very tiniest of holes that were clogged by the silt from our spring-fed water system. After that little plastic dictator was popped out, the water flowed clear and stronger than we’ve ever had from the kitchen sink. Success!

Now I know this is a cabin blog and not a forum for corporate discontent, but I’d like to take a moment to say to the faucet manufacturers of the world: aerators suck. I’m an adult and I can regulate my own water usage. In this case, our water comes out of the side of a mountain and keeps flowing at 100 gallons per hour no matter whether we turn on the tap or take a dozen showers. We are lovers of nature and truly want to be good stewards of the earth (we have a cabin in the woods for crying out loud!), but, please, for the love of god, let me wash my dishes.
Spring has sprung… and, well, not quite at the temperatures I’d like but we’ve got cabin fever after the long winter. Over Valentine’s weekend, we finally were able to schedule the electrician for a return visit. we are now the proud owners of (drumroll please) outdoor lights! Overhead lights ON A SWITCH! A ceiling fan!
Having the guy walk through the door and say, “hey, it looks different in here!” was pretty sweet too.
Lots of new things in store this spring…
One of the things that’s been very frustrating has been the process of trying to get the cabin insured against loss. I had no idea that his would be such a major ordeal… I mean, it’s not like we’re located in the Alaska wilderness! Nonetheless, I’m now on my fifth insurance agency, and hoping that Farmers’ will be the one that finally offers us coverage.
As I’ve learned, our cabin is too small, too remote, too far from a fire hydrant, in the wrong state, and on the wrong kind of foundation. I’m glad we didn’t try to get a mortgage on the place because we would have never met the insurance requirement (not to mention the inspection, but that’s a separate issue). If you’re reading out there, I’d love to know whether you have insurance on your remote cabin and, if so, from whom?
You must be logged in to post a comment.